

Do you want to create a print-on-demand store and don’t know how to go about it? In this post, you’ll learn how to design a print-on-demand t-shirt website using Shopify and Printful. These steps are the same for all print-on-demand products such as T-shirts, sweatpants, phone cases, mugs, pillows etc.
I’ll be explaining it using two platforms. Shopify and Printful.
Table of Contents
What is Shopify:
Shopify is an eCommerce platform for creating an online store. Simple!
What is Printful:
Printful is a print on demand platform that helps you fulfill print-on-demand order you receive on your store. In simple term, when you receive an order on your store, the order appears in your Printful account (after linking your Printful account with your Shopify store), you order the item from Printful, Printful take up the order and deliver to your customer.
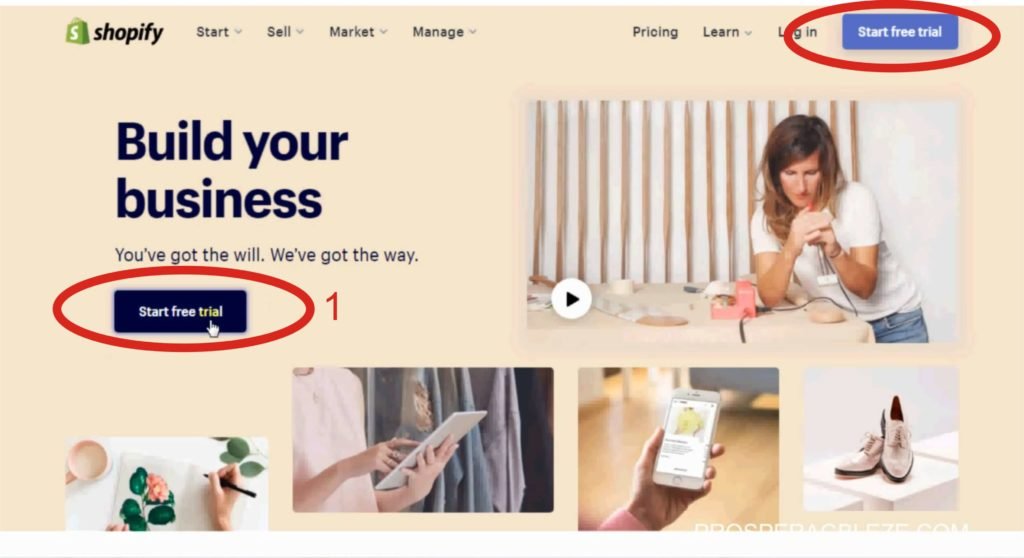
To date, print-on-demand is still a viable business model due to the increase in online purchases every year. To get started, you’ll need to sign up to Shopify.
Signup to Shopify:
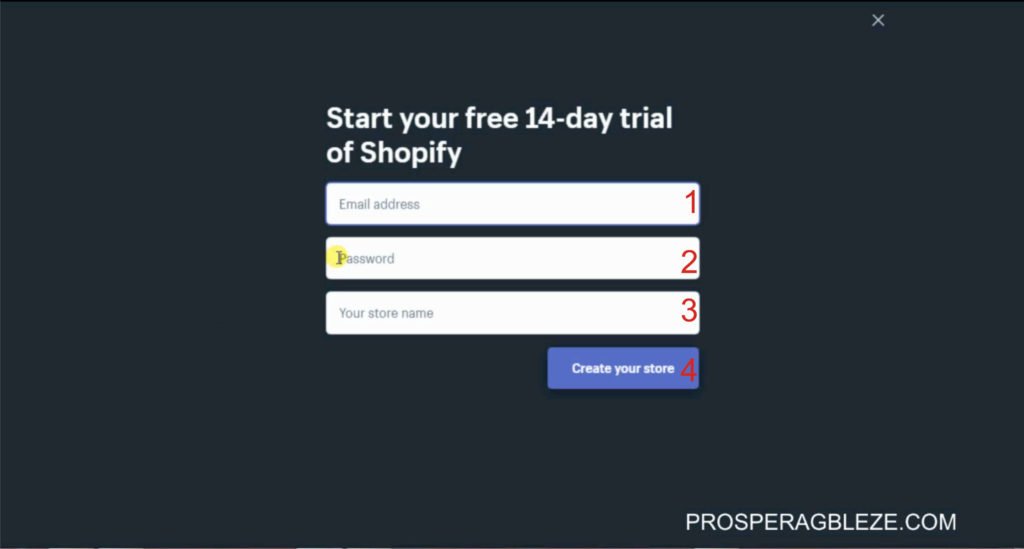
Visit akprosperblog.com/shopify and click Start free trial. On the next page, enter your email address, password and store name. Make sure your store name is unique. That is a name that is not on the Shopify system. Fill in other necessary information then click Enter my store.

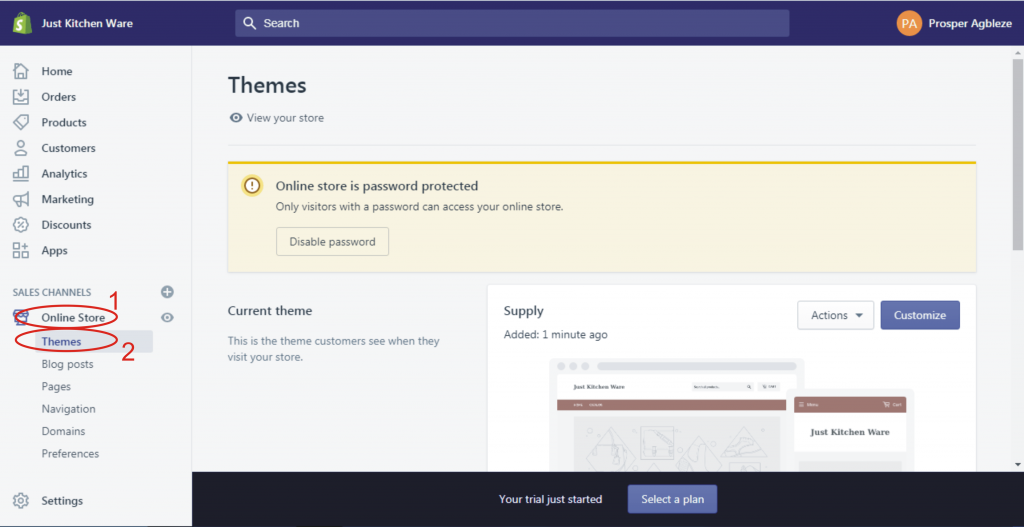
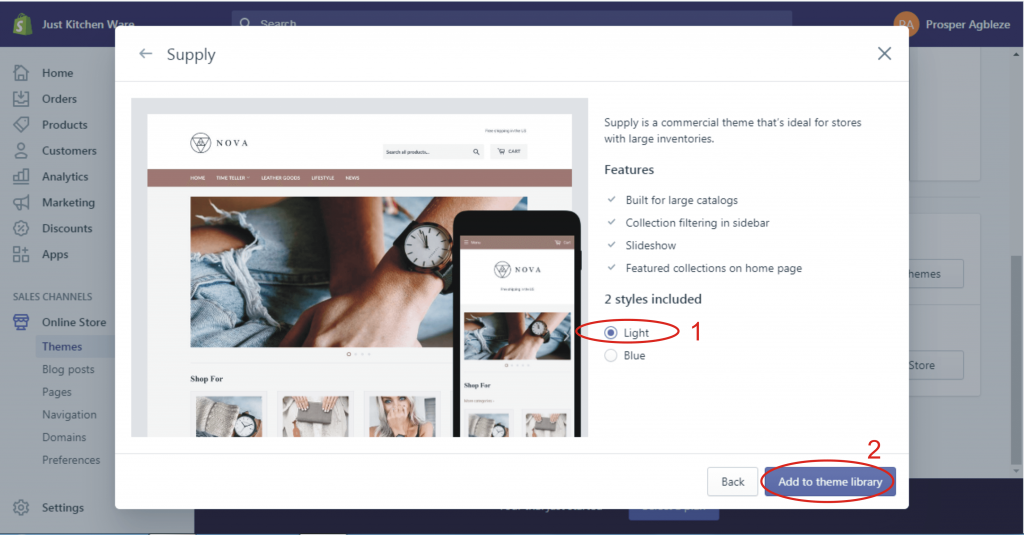
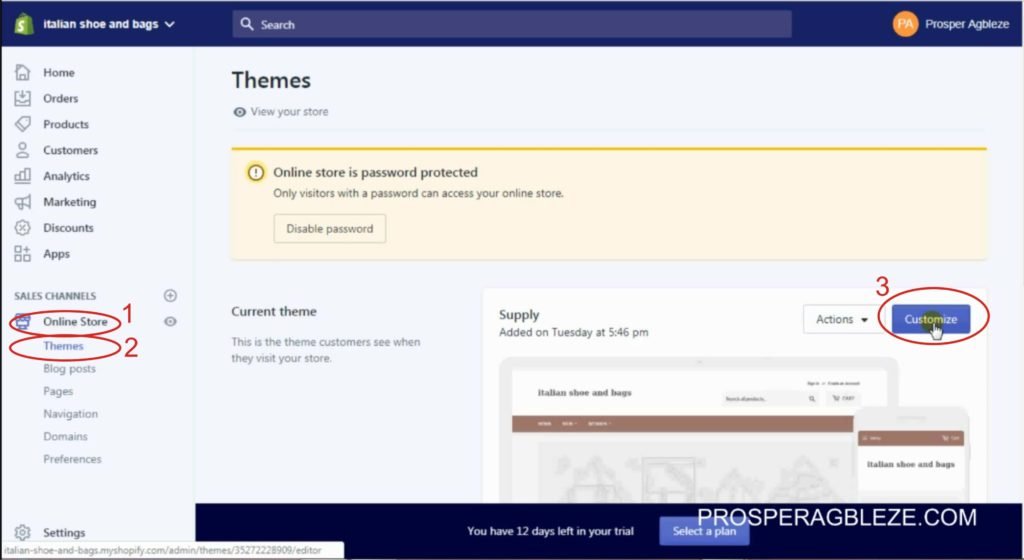
Add Theme:
To add a theme to Shopify, click Online store >> Free Themes >> Select the theme you want to use >> Click Add to Theme Library. Once the theme has been added to your library click Publish.
Signup to Printful:
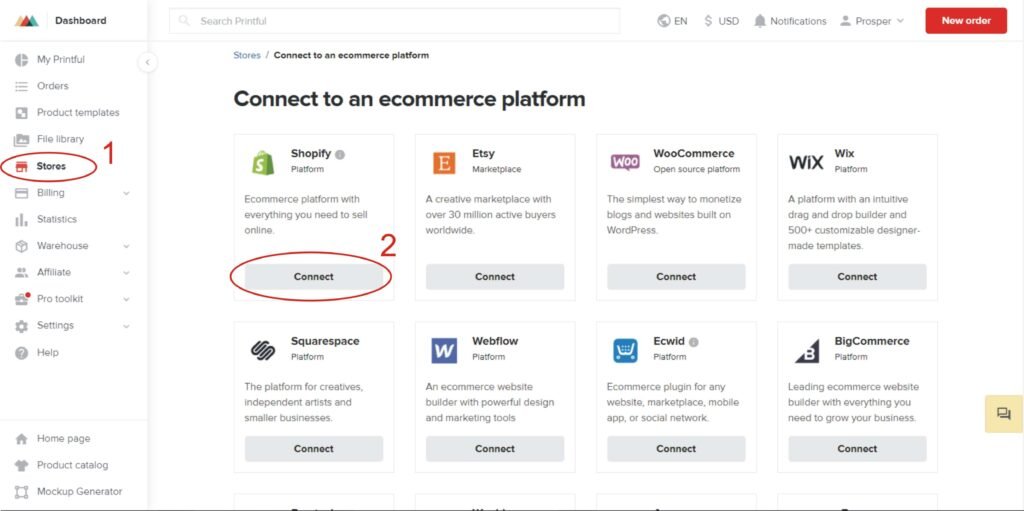
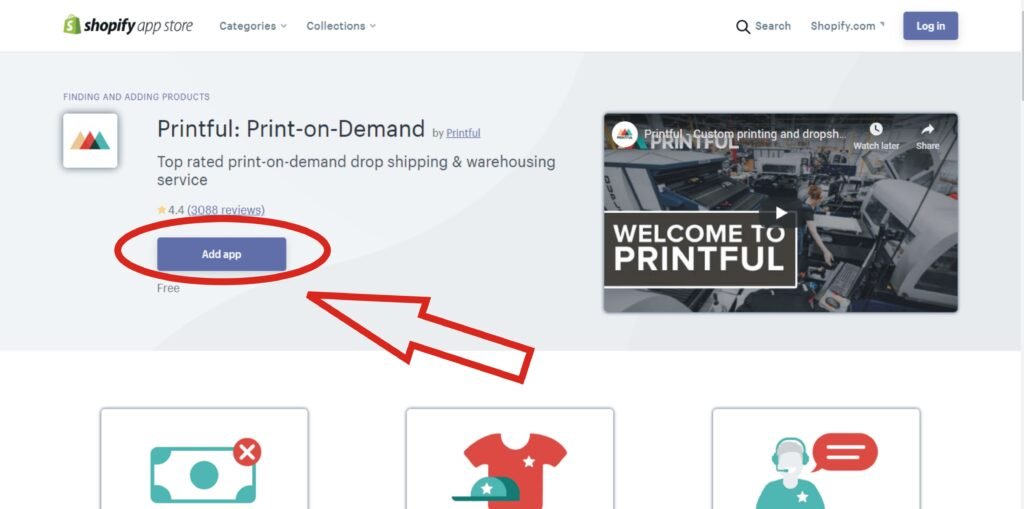
Visit akprosperblog.com/printful to sign up to Printful and confirm your email address. The next thing is to connect your Printful account with your Shopify store. From your Printful dashboard, click Stores >> Choose platform >> Select Shopify and you’ll be redirected to the Shopify app store where you’ll add the Printful app. (Note: If you are logged out, log in again with your Shopify login details). Click Add app >> Install app >> Confirm connection. With this, you have successfully connected your Printful and Shopify Store.
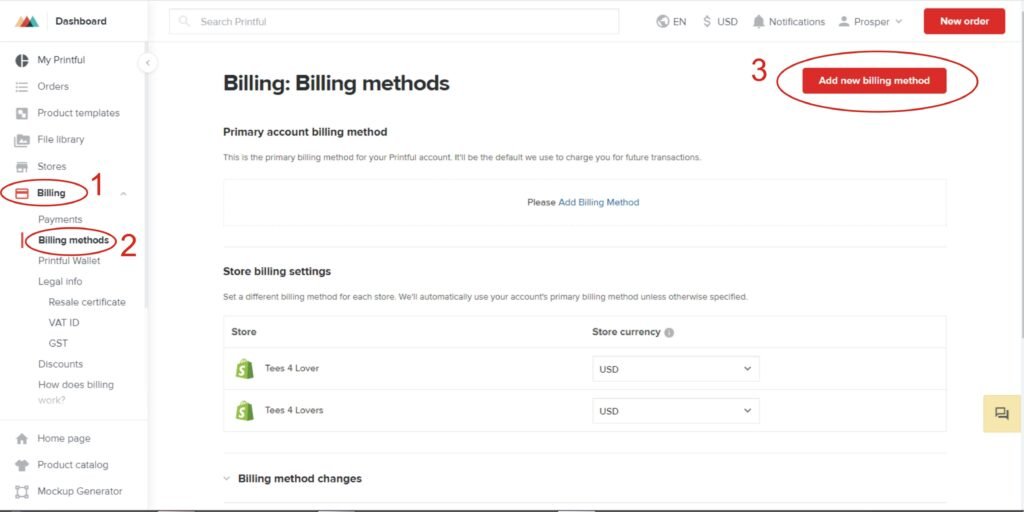
The next thing is to add a billing method to your Printful account. To do this, from your Printful dashboard, Click Billing >> Billing methods >> Add new billing method, enter all the necessary details then save.
Create and Add Products to your Shopify Store:
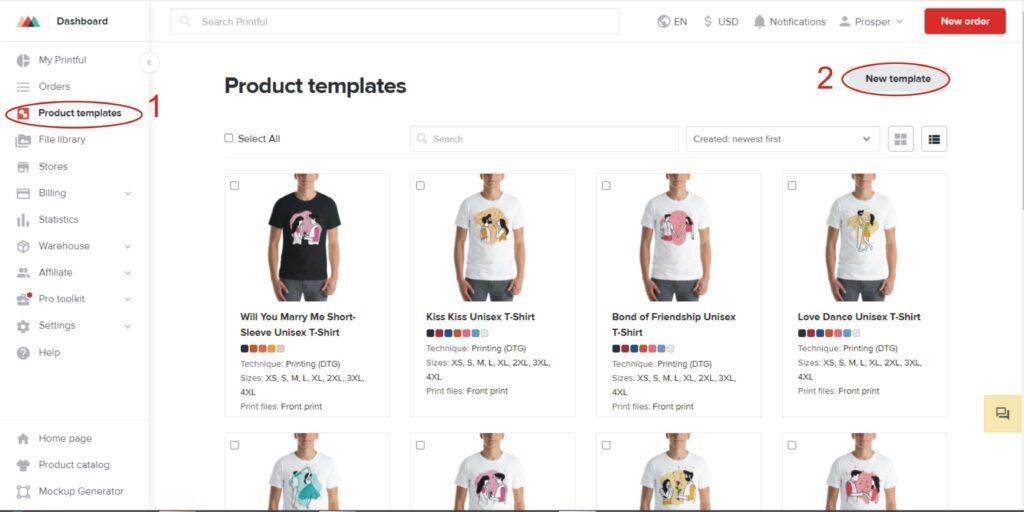
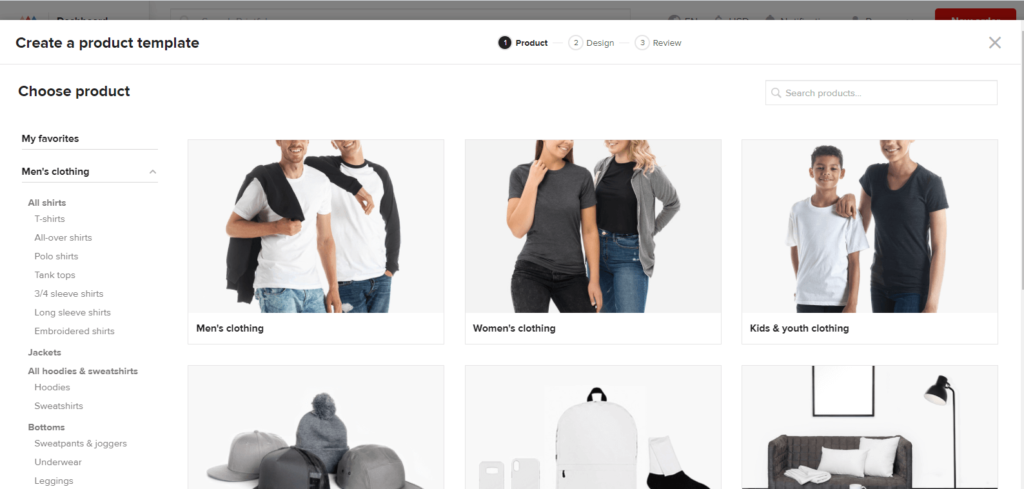
From your Printful dashboard, Click Product templates >> New Templates>> Choose products and select the type you want. Next is to upload your design >> Select colors>> Add Product template title >> Select the sizes you want then Save the product template. With that, you’ve successfully created a product template.

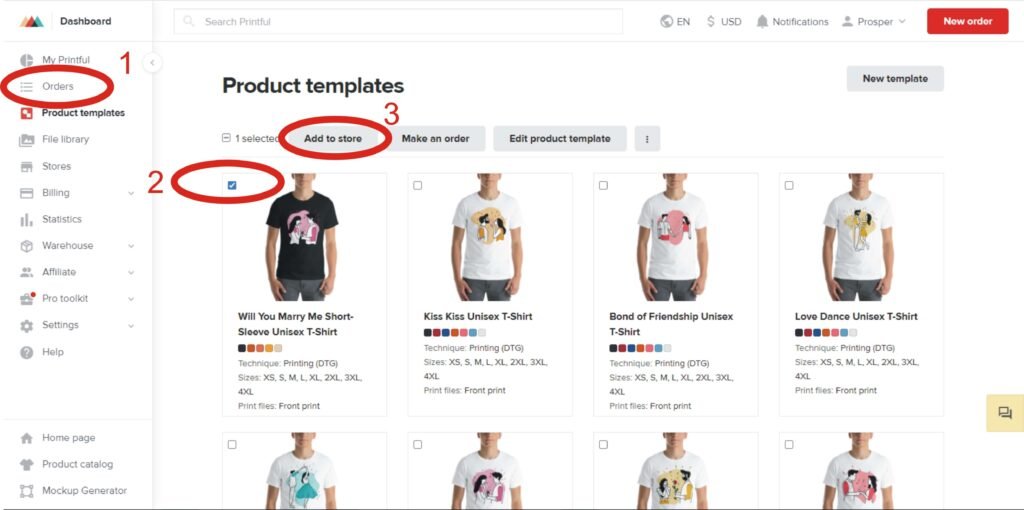
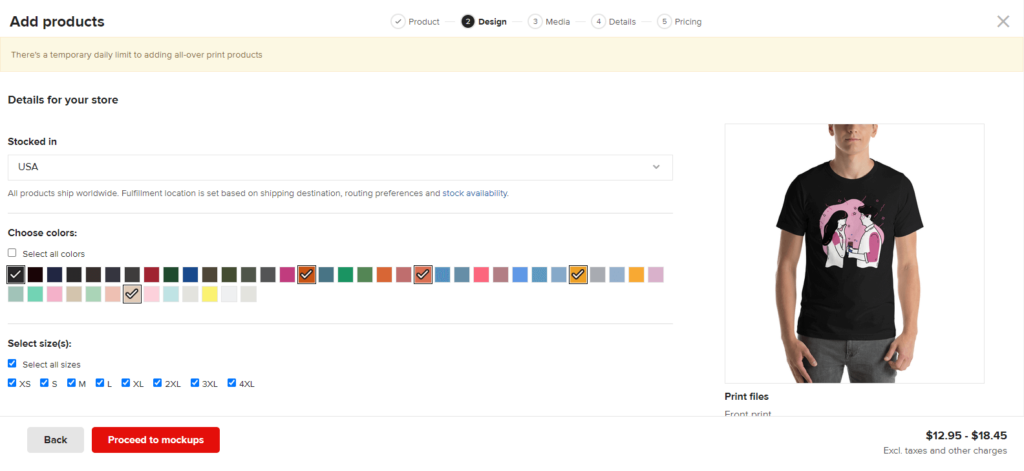
To add the product to the store; from Product templates >> Select the product you want to add to your store >> Click Add to store >> Select store >> Select stocked in (select a region that is closer to your targeted customers) >> Choose colors>> Choose sizes >> Choose mockup style >> Enter product title >> Check any necessary add-on then proceed to pricing.
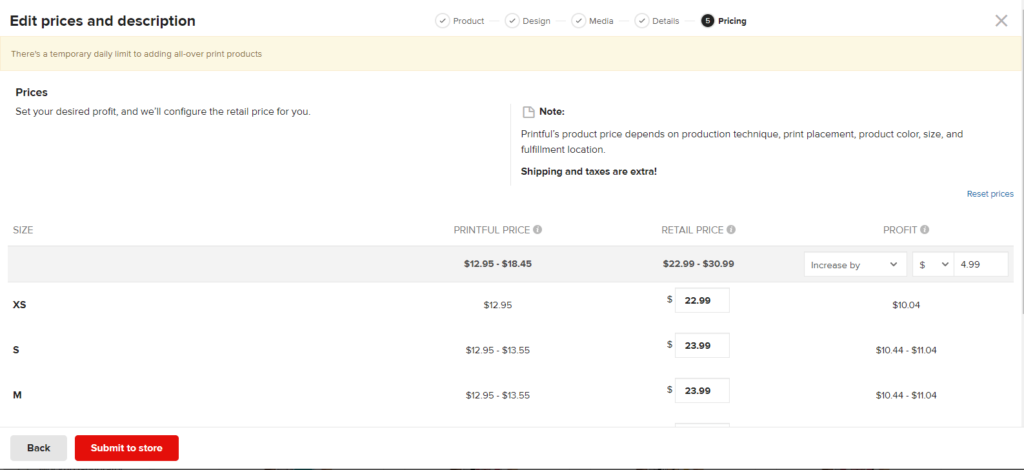
To set up pricing, enter your desired profit and Printful will configure the retail price for you. When you’re done, click Submit to Store and the product will appear on your Shopify store. Repeat the process for as many products as you want to add to your Shopify store.
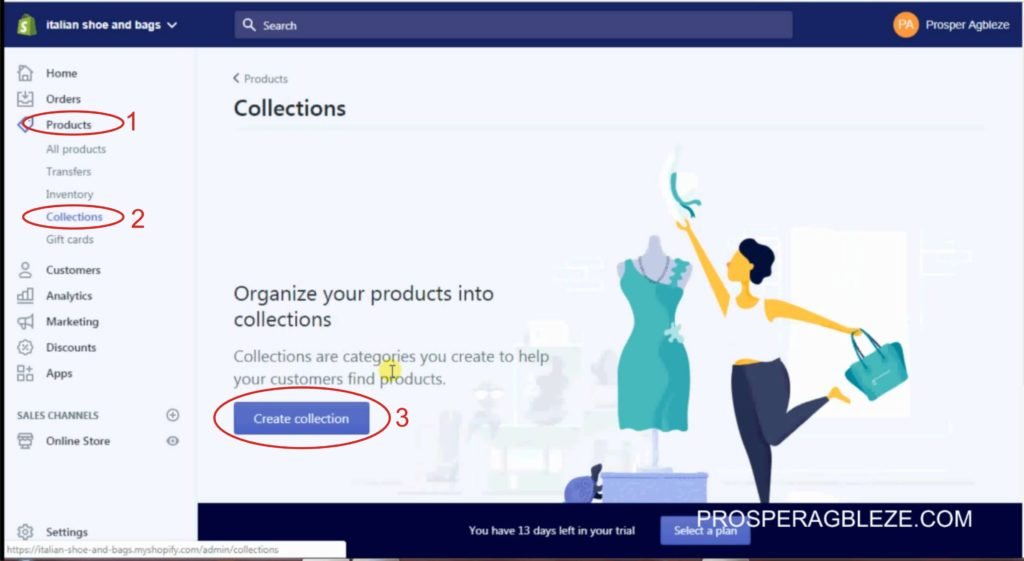
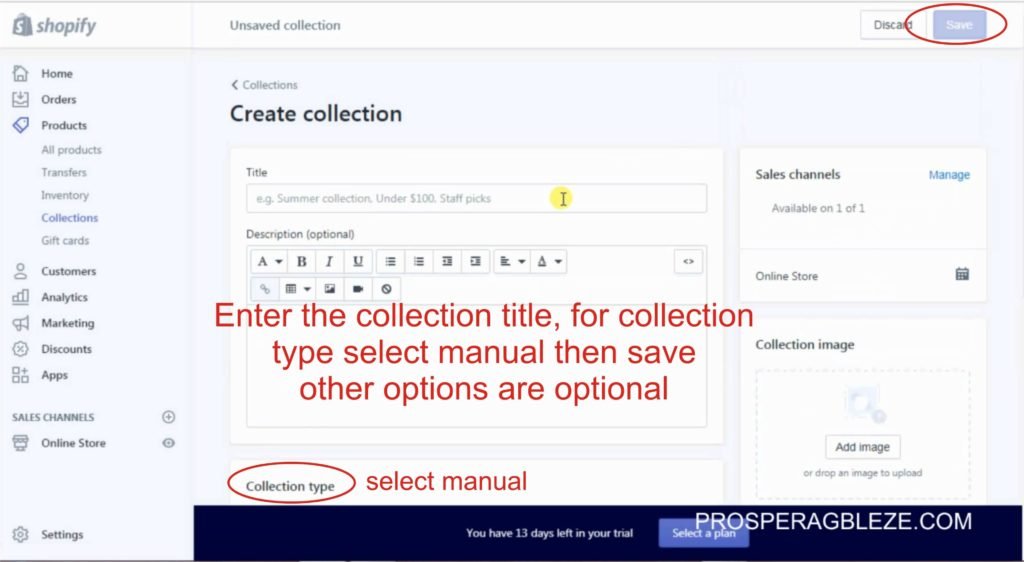
Create Collection.
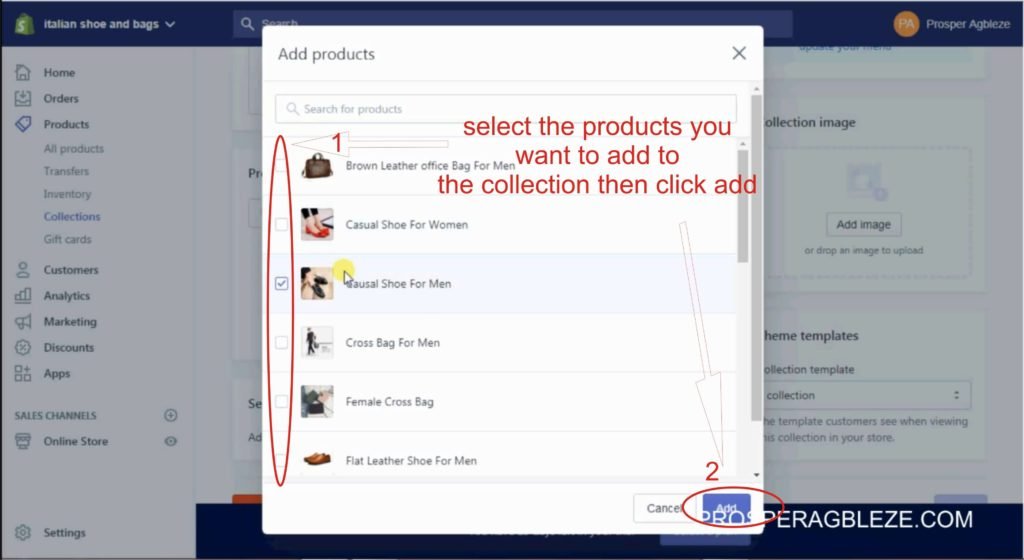
This is a way of grouping similar products together. To create a collection in Shopify, from your Shopify dashboard Click Products >> Collections >> Create a collection. Enter the title (name) of the collection, set the collection type to manual then save. Once saved, click on products and select the products you want to add to the collection.
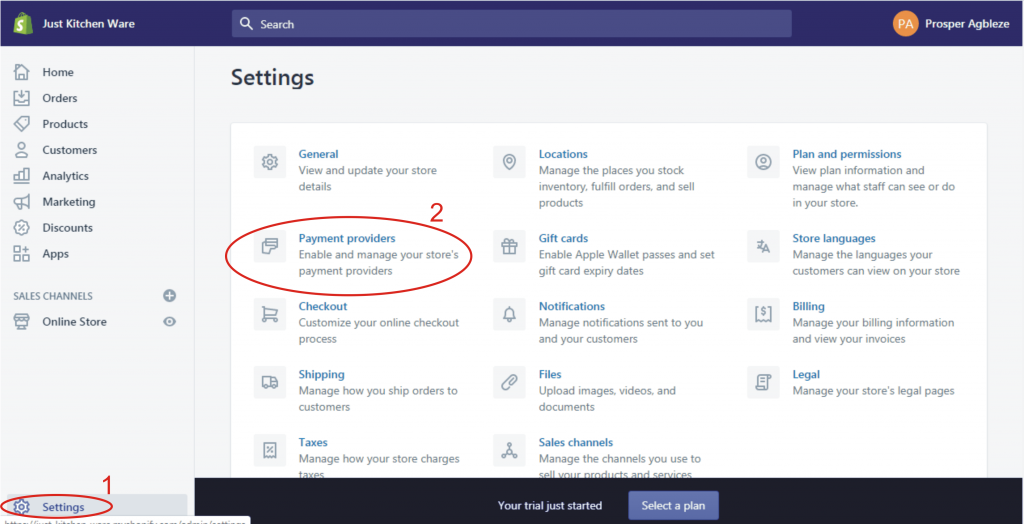
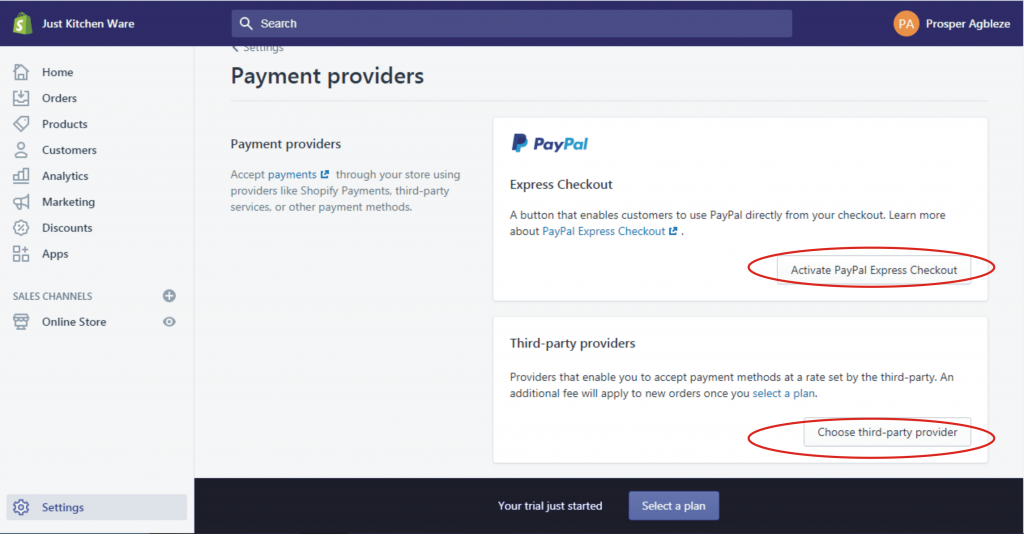
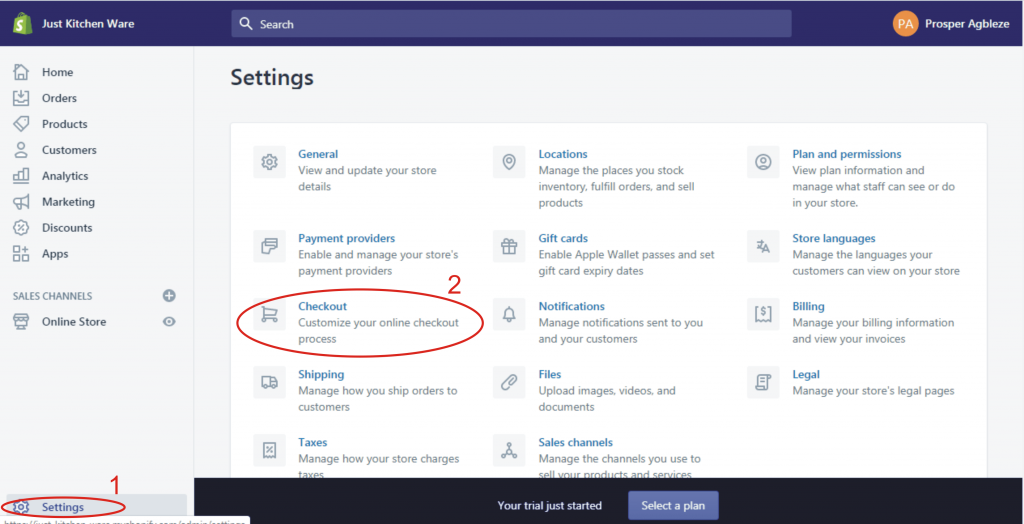
Setup Payment and Checkout:
To set up payment, Click Settings >> Payments. To use PayPal, click Activate PayPal Express Checkout and set it up. To use other payment gateways to receive payment in Shopify, click Choose a third-party provider and select a payment provider that is available in your country.
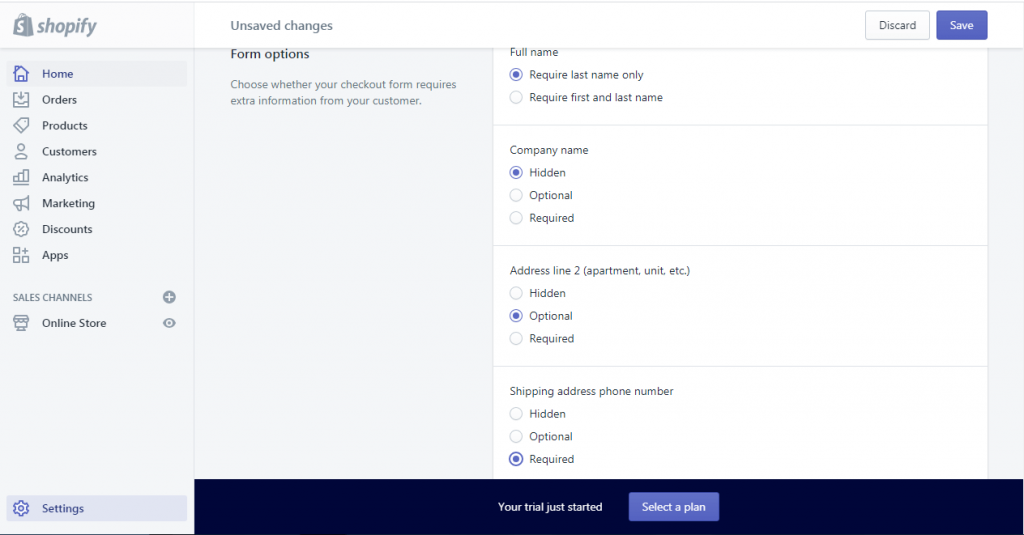
For checkout, I personally choose customer accounts to be optional, and phone numbers required. You can choose other options that you deem fit.

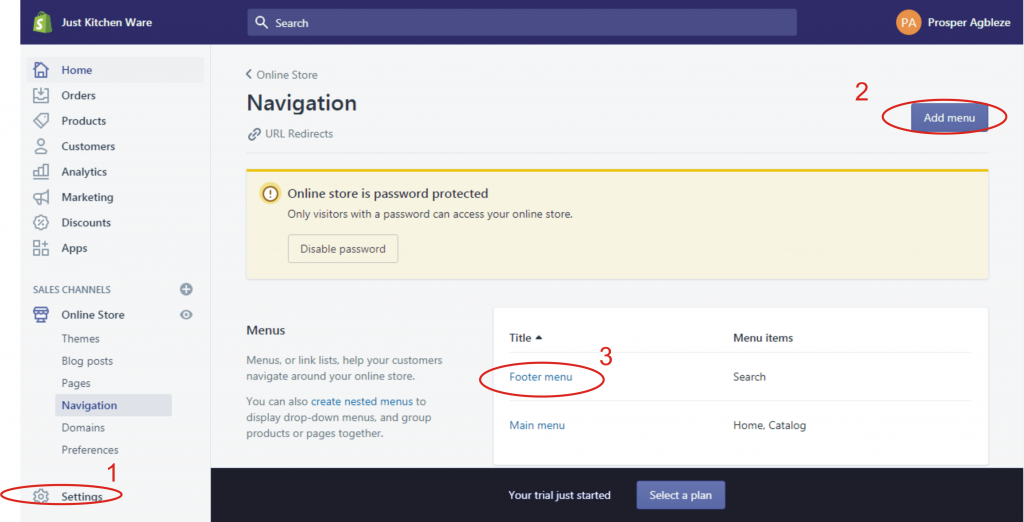
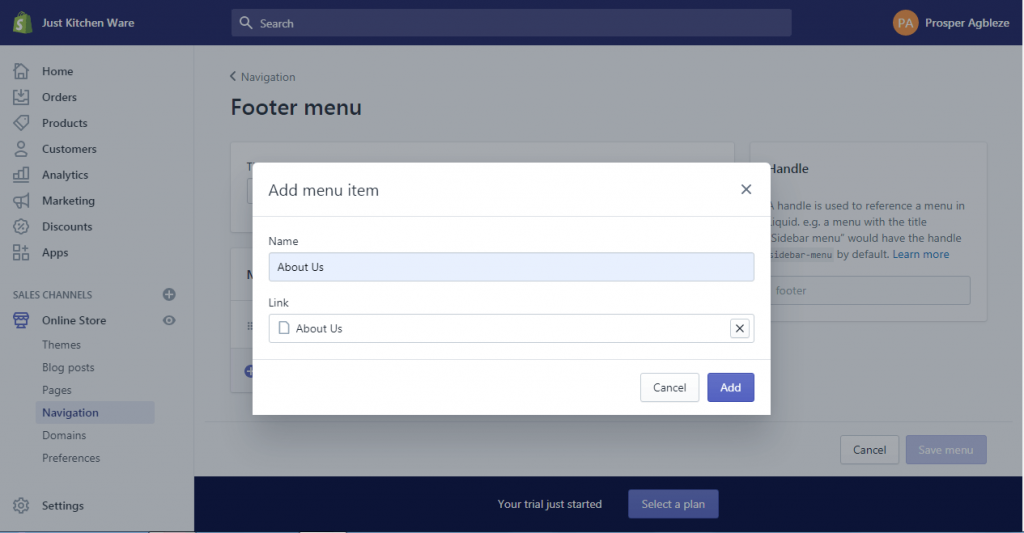
Create Pages and Menu:
To create a page, Click Online Store >> Pages >> Add page. Enter the desired page title, and content then save. To create the Contact page in Shopify, enter the title (Contact Us), leave the content empty, on the template suffix at the right, select “page.contact” then save.

For menu, click Online stores >> Navigations. There are two options; footer menu and main menu but the process is the same. Click on it and add a menu item.
Customize store:
Click Online Store >> Customize. Here you’ll be able to customize the header (add or remove announcement bar, add logo etc.), add sections (Slideshow, Featured collection, Collection list, Featured product, Map, etc.), and add different options to the footer.
Under the customize option, we have a theme setting. Here you can change and set up your Shopify store layout, color, typography, favicon, and social media account, design the checkout page and change the theme style.
When customizing your Shopify store, always make sure you click Publish to save all the changes.
Also Read: Top 10 Recommended Shopify Apps
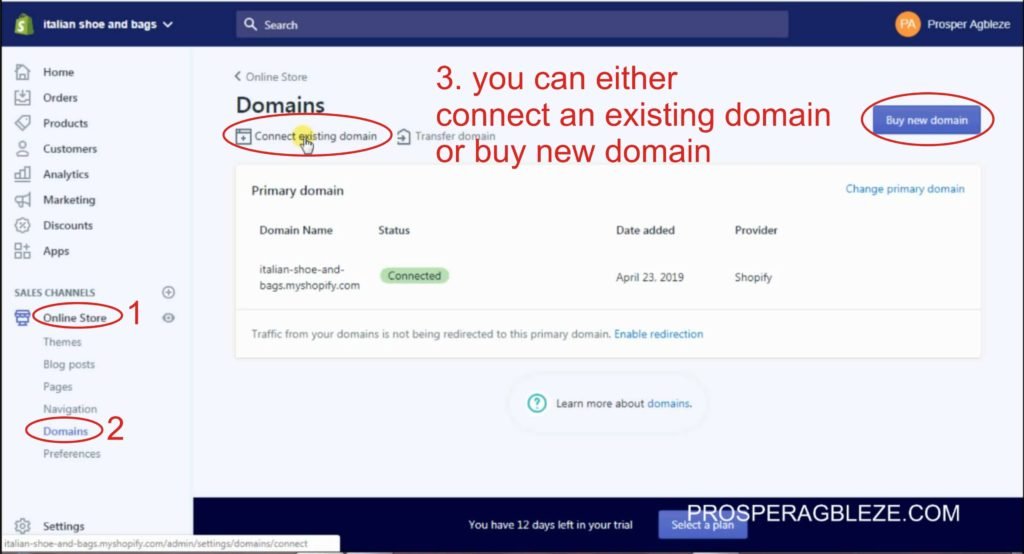
Add Custom Domain to your Shopify Store:
Custom domain makes it easy for people to remember your store name and it’s good for SEO purposes. To add a custom domain name to your Shopify store, click Online Store >> Domains. There are three options: Connect the existing domain, transfer the domain or buy a new domain. Click anyone that applies to you to add a custom domain name. If you want to buy a new domain name, click Buy new domain >> enter the domain name to check if it is available. If available, click Buy and add a payment method (Credit card or PayPal) to buy the domain name.
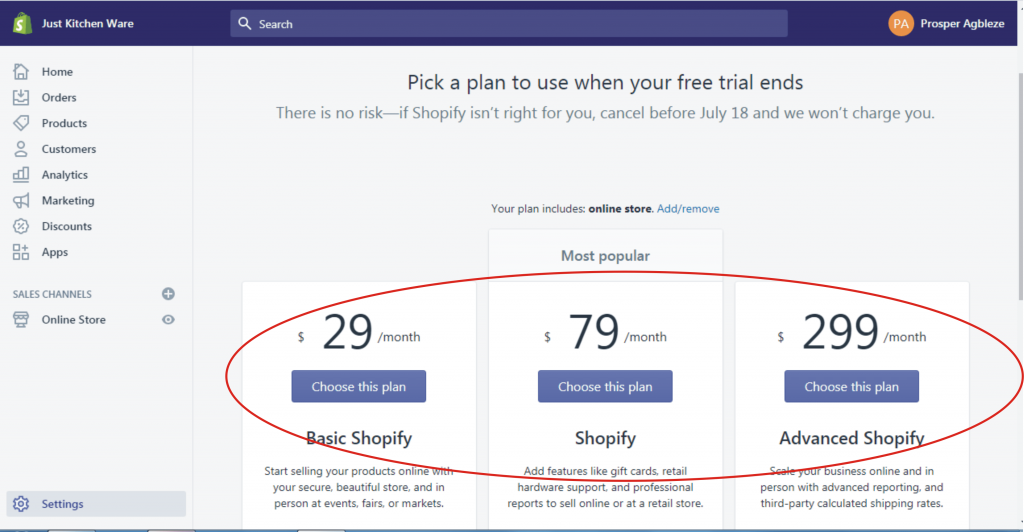
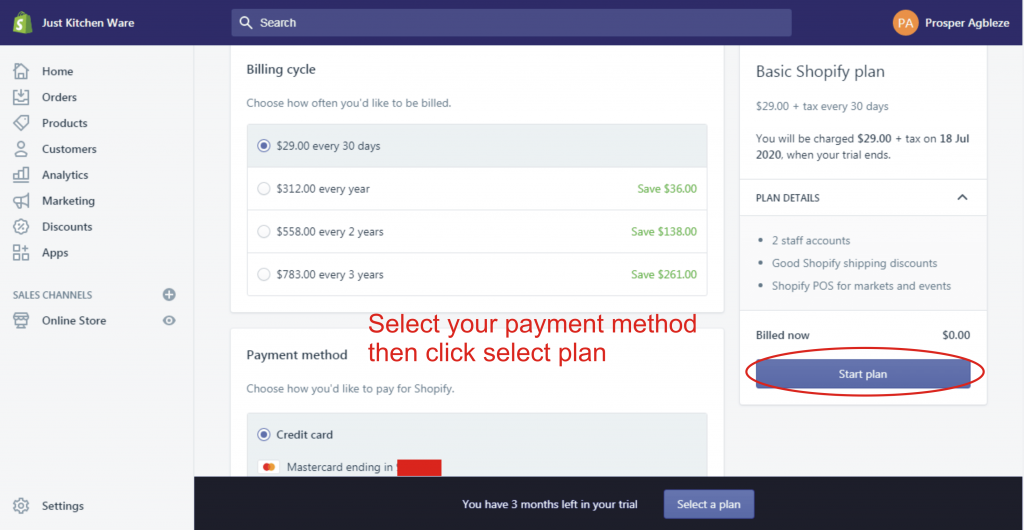
How to Select a Plan and Remove Store Password:
Removing your Shopify store password will make your store accessible to the buyer and enable the checkout page. Click Select a plan showing after your free trial. If you’re just starting, I recommend you start with the $29 per month Basic Shopify plan. Click Choose this plan >> Select your billing circle >> Select your payment method (Credit card or PayPal) and click Start plan. Note that you will only be charged at the end of your 14-day free trial.
To remove store password in Shopify, Click Online store >> Preferences >> Scroll down to Password protection, uncheck Enable password then save.
Make a Test Order:
A detailed explanation was made in the video tutorial below. Order received will appear in your dash when you click on orders.
Also Read: How to Create Shopify Facebook Page for Running Facebook Ads
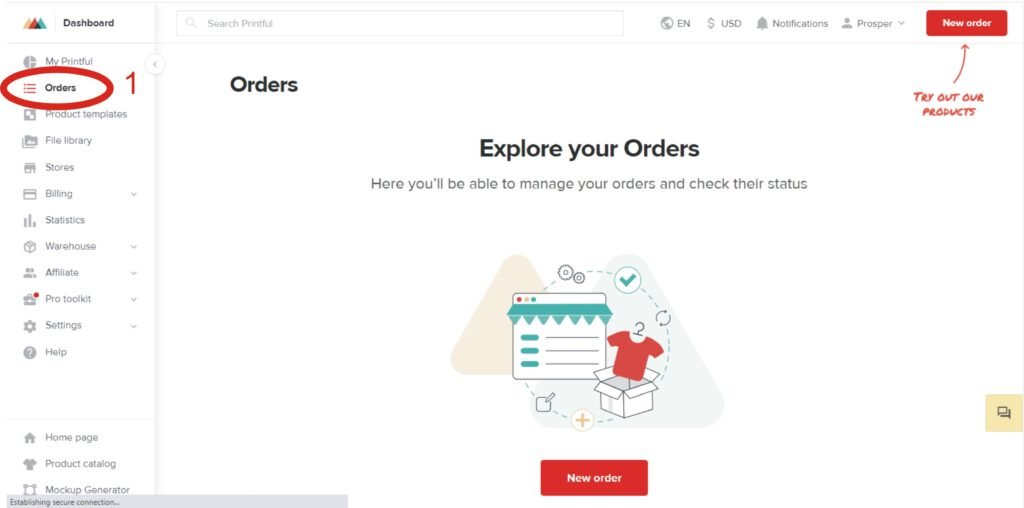
How to Fulfill an Order:
When an order is made on your store, it will also appear in your Printful account. There you’ll be able to make the order and Printful will process and deliver the order.
With that, you have successfully created a Print-on-Demand website with Shopify and Printful. To get started, sign up to Shopify and Printful and follow all the steps above. For a more detailed explanation, watch the print-on-demand video tutorial below. If you have any questions or comments, feel free to leave them in the comment section below.
Please click on the share button below to share this post. Thanks.


